![Logo-RGB.png]](https://help.repmove.app/hs-fs/hubfs/Logo-RGB.png?height=40&name=Logo-RGB.png)
There are two ways to import your accounts to RepMove.
Customers and Prospects have to be imported in separate spreadsheets.
Import Steps
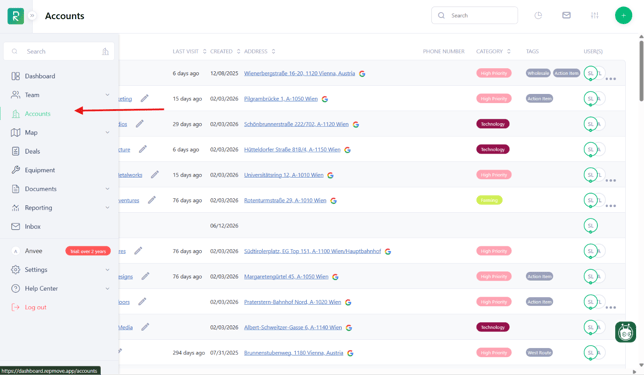
- Go to your RepMove web-based dashboard and click on the Accounts tab in the left-hand menu.
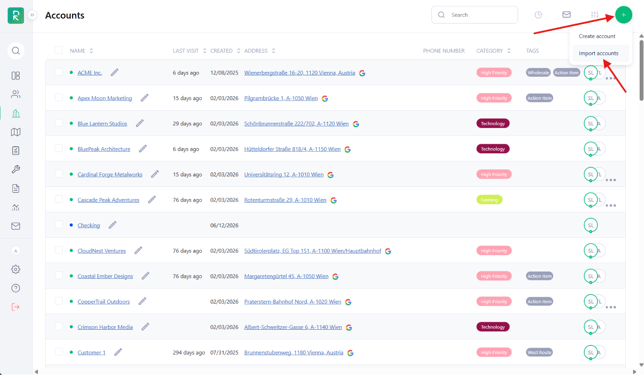
- Click the plus (+) Icon in the top right-hand corner and select Import Accounts.
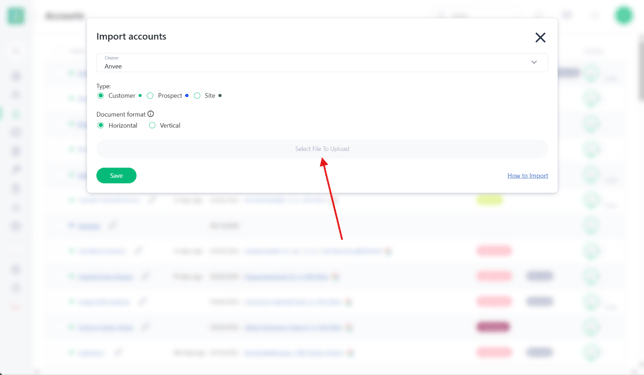
- If you have multiple people in your team, select the User this spreadsheet import will be assigned to in the drop-down box.
- Select whether you want to import the spreadsheet as customers or prospects.
- Click Select File To Upload and find the spreadsheet file on your computer.
- Match the fields on your file to the RepMove fields.
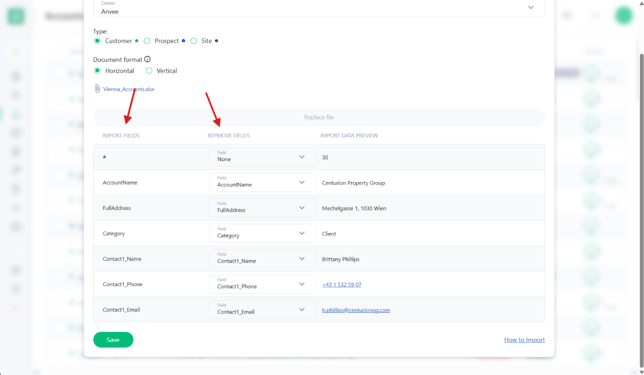
- Click Save, and your import will start.
Depending on how many accounts you are importing, this process can take a few minutes.
If you use the RepMove spreadsheet
There are two formats available depending on how your contacts are structured:
Horizontal vs. Vertical Import — What's the difference?
Horizontal Import
Use a horizontal spreadsheet when each account has multiple contacts listed across columns in the same row. Each contact occupies a set of columns (Name, Phone, Email) side by side on the same line as the account.
Example:
| AccountName | Address | Contact1_Name | Contact1_Phone | Contact2_Name | Contact2_Phone |
|---|---|---|---|---|---|
| Acme Corp | 123 Main St | John Smith | 555-1234 | Jane Doe |
555-5678 |
Vertical Import
Use a vertical spreadsheet when each contact for an account is listed on its own separate row, stacked vertically under the same account name.
Example:
| AccountName | Address | Contact1_Name | Contact1_Phone |
|---|---|---|---|
| Acme Corp | 123 Main St | John Smith | 555-1234 |
| Acme Corp | 123 Main St | Jane Doe | 555-5678 |
Use this format when: an account has a variable number of contacts, or you are exporting from a CRM that outputs one contact per row.
Follow the import steps.
Assigning Accounts to Users via Spreadsheet
Rather than selecting a single user from the drop-down during import, you can assign accounts to different users directly in your spreadsheet by including a user email column.
To use this feature:
- Add a column to your spreadsheet named AssignedUserEmail (or map it to the corresponding RepMove field during import).
- Enter the RepMove login email address of the user each account should be assigned to.
- During import, map this column to the Assigned User field in RepMove.
RepMove will automatically assign each account to the correct user based on the email address in that column. This is especially useful for large team imports where accounts need to be distributed across multiple reps in a single upload.
The email address must match an existing user's login email in your RepMove account. Any rows with an unrecognised email will fall back to the default user selected in the import drop-down.
Linking Customers/Prospects to Sites (and vice versa)
If your accounts include both Customer and Site account types, you can link them to each other during import using one of the following reference columns in your spreadsheet:
| Column | Description |
|---|---|
| LinkAccountId | The internal RepMove ID of the account to link to. Use this when you have previously exported accounts from RepMove and have their system IDs. |
| LinkAccountName | The account name as it appears in RepMove. RepMove will search for an exact name match and create the link. |
| LinkAccountReference | The custom account reference field value. Use this when you have your own reference numbers or codes assigned to accounts. |
How it works
- To link a Customer to a Site: include one of the above columns in your Customer import spreadsheet and populate it with the corresponding value from the Site account you want to link it to.
- To link a Site to a Customer: do the same in your Site import spreadsheet, referencing the Customer account.
- RepMove will automatically establish the relationship between the two accounts on import.
If you are importing both Customers and Sites for the first time, import your Sites first so their IDs, names, or references are already in the system when you import Customers and create the links.
Handling Import Errors
If incorrect data is present (such as a bad address or a missing required field), a report will be visible at the top of the pop-up that tells you what needs to be fixed.
Need help?
If you need assistance with the import process, please email the corresponding spreadsheet and any questions to support@repmove.app. Please feel free to also give us a call at 720-588-3386.